OK, so for the few of you who waited...perhaps you already figured it out already... but just in case :) Here's the rest of the story:
Part 2: Mini 9 Patch Squared UP
Part 2: Mini 9 Patch Squared UP
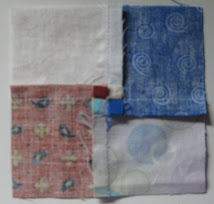
So now that your blocks are all sewn, lets give these babies a hair cut :)

The first thing I do is to place the ruler on the block to make sure that the center square finishes at exactly 1 inch square. then you will notice in the photo above - I align my ruler to have 1 and a quarter inch from the seam on the far right (or in my head 5th mark on the seam on the right side...maybe that only makes sense to me?)
then you will notice in the photo above - I align my ruler to have 1 and a quarter inch from the seam on the far right (or in my head 5th mark on the seam on the right side...maybe that only makes sense to me?)
Yes it will finish at 1" when placed into a quilt - but until then you need that extra 1/4" added to it. Now slice. Repeat this to all four sides of your block.

This is where those rotating lazy Susan type cutting mats come in handy... but I don't have one yet. For this tutorial, I just turn the block each time... but when trimming all the blocks for my sets for the swap I use a smaller cutting mat on top of my big one and just turn it each time around before placing my ruler down each time.

 TaDa!!! Here's the perfect mini 9 patch block!!! and those little trimmings aren't really much waste at all - NO waste if you ask me... since making them just a tad bigger results in PERFECT sized 3.5" blocks! :)
 Let me know if you try this method... or if you have any questions, let me know. I'm always glad to help.
Love from Texas!