>

Pages

Thursday, June 25, 2009

"Ta-Da!" - "Ta-Da!!" - "Ta-Da!!!"

The first of the "Ta-Da" showings we have for you is Nora's MAGIC TRICK she did this morning. Actually I did it and she pretended she was the magician ;) While opening up a new garbage bag I threw it up a couple of times into the air entertaining the twins and on the last go round it stuck to the popcorn textured ceiling and hung there for about 2 minutes before falling.

Just long enough for me to run out to the van and get my camera and come back and take a couple of shots before it fell. :) Just one of the million of things a stay-at-home mom gets to have fun experiencing with the kids.. ;)

And the second "Ta-Da!" I have to share with my readers today are these beautiful String blocks that arrived in the mail box from HGTV Sunshine Quilters ajne and AngelaC

and the third "Ta-Da" is also something else quilty in today's mail. Actually not in my mailbox but sitting on top of my garbage can beside the garage door when I got home from running erands today.... can you guess what?

Yep! A quilt that I had sent off to be quilted a while back. On one of my yahoo lists I read where Joanne had posted about her "Quilter's Stimulus Package" (and her post on her update) as an opportunity to break in her new longarm quilting machine and at the same time allow quilters to get some tops quilted at super great low prices.

I knew it would be a simple all over meander and that was fine for this Bento Box pattern. I did request she use a variegated thread which she did and I really like how it turned out.

Visit Joanne's Splitting Stitches Blog and take a look at all of the beautiful quilts she's quilted for all the people who signed up for her Stimulus Package for quilters ;)

Monday, June 22, 2009

Mail call - more strings are here

06.19.09 from charmingsister


06.22.09 from rstraus

I just love collecting string blocks form our HGTV Sunshine Quilters group to send in to Sue with the Heart Strings Quilt Project later next month. I get to open all the packages and take a first hand up close and personal look at all the variety of fabrics used to make up the blocks ;)

The first year I participated in the Sunshine group I hosted a month and put together two Bento Box quilts from blocks made from the members. And while I'd love to put together more quilts, for me it's been easier and as much appreciated to just "collect" blocks and them mail them into Heartstrings on behalf of all of us in the HGTV Sunshine group. The year I was pregnant I collected for two months... one scrappy around red and then in Oct strings that were all pink and white around pink centers.

Last year and this year I'm keeping it simple sister (KISS) and just collecting one month scrappy around red centers ;) and am so pleased there have been so many Sunshine members participate and send me more than their required 2 blocks ;)

Thanks Sunshine friends! I'll be leaving on vacation this coming weekend but while I'm gone my mail lady will hold my mail so any packages that come during that time will be AOK downtown at the PO ;) I won't mail our blocks until the end of July to Sue at Heartstrings - so you all still have plenty of time to make blocks if you haven't already ;) Thanks!

Love from Texas!

Friday, June 12, 2009

Mail Call - String blocks from Sunshine Quilters

Sorry to keep my HGTV Sunshine friends waiting so long for photos... gosh it's been a long day here - it is already 9:35pm and I'm just now getting to come downstairs from our bath/book/prayers routine... the kids got to be much later than usual and I was so ready to jump in the bed myself... but knowing that the kitchen table was a mess is what pulled me back downstairs.

Above are blocks made by faye that were received last Friday 06.05.09 Aren't they great?

I thought I'd better upload photos before I get started on clearing the kitchen table and distracted. Or maybe I'm already distracted if I'm doing computer stuff first? LOL :P

and look at these made by terrimae (also received last Friday)

They even have a strip of our COF Retreat challenge fabric in them! very cute!!! (The royal Blue with cows)

and if anyone else mailed to me that I should have already before now... let me know. Our weekend mail carrier guy was involved in a wreck last Saturday and it totaled the mail truck and they were picking up letters all over the road...

I talked to my regular carrier today and she told me that he was taken to the hospital. We didn't get any mail until Tuesday of this week... poor mail guy had 2 broken ribs and one bone in his leg broke also...... and if that wasn't bad enough...

A witness to the wreck was brave enough to chase down the guy who HIT AND RUN!! and caught him! Can you believe driving off from that kind of accident? what is wrong with people??so if I should have your block already, but haven't reported it as received... let me know so I can be on the look out for it... It should have arrived by now I'd think... we've received mail everyday since Tuesday... but let me know and I'll look into it.

Happy Weekend everyone!

Love from Texas!

Thursday, June 11, 2009

I have my next leader/enders prepared and ready to go!

Edited to add: The first thread over on the HGTV board was so good that there has been another started called "I love Leader/Enders! (Continued) click over to take a look... great ideas and photos being shared over there ;) But be sure and come back here to read my blog, OK? ;)

Do you remember how I mentioned there was some great discussion going on over on the HGTV board about "THE" Bonnie's Leader/Enders system? Well I've been doing some prep work and have my next set of what I'm gonna be using for my own leader/enders. These are the scrappy 4 patch blocks for the Christmas Lights Mystery I'm working on in between other projects. (This is part of 1 of 3 published in Quiltmaker magazine - and I have about 2 months to get them done :) so using them as my leader enders will be perfect)

I have a larger acrylic table that surrounds my machine but I'm not currently using it... but I do have a smaller little plastic shelf like thing attached... (see above) For now I've just pinned a few dozen of these blocks and placed under there - easy to quickly grab 1 or 2 and sew up before I get up to go press from chain piecing on my other current project.... ;)

here is a photo of more 2 piece units that will be next in the leader/ender pile... I don't have enough pins to pin them all up - but that is OK. after the others in the 1st photo get sewn I'll sit and pin up 2 dozen more. :)

It's small steps like this that get the job done! and speaking of small steps... look who were stepping back and forth the opening to the dining room as I was in there... I wish you could hear their little feet pitter patter as they ran up and down the halls.

Can you believe that last week (06/04) Olivia and Paul Thomas turned 2 years old!!!? yep, they sure did! I posted Birthday photos over on our family blog. (click on our family photo at the top right of this page to take you there)

and here is my little man.... sitting here trying to figure out a way to make that rooster fit thru that hole in the gate. :P He worked on that for the longest time.... and then Olivia walked up and distracted him long enough to snatch it out of his hands and she thru it over top of the gate and he got so mad and turned on the water works wanting it back... so he could sit down again and try to figure this out. LOL

and while he is good at being a problem solver... he is even better at being a problem maker! Don't even get me started about the love seat cushions or the speaker wiring in the den :/ BOYS! :P

Love from Texas!

Wednesday, June 10, 2009

Just a little homework

Who said Homework wasn't fun? I la,la,LOVE doing my homework when I have these super great Triangulations to use for my 2" finished HSTs.

Here and there when I get a minute to sit down to sew I've been chasing the lines on the paper with my presser foot. ;) It sure doesn't take long to zip thru one of these... and before you know it you have a dozen or more ready to cut apart.

In each of these stacks are 8 HST's cut apart and snipped dog ears off of and are now ready to finger press and rip the papers off of... I hear the DVR shows calling my name :) and I'll take these along with me.

Oh and if you don't have a pair of these scissors yet, I highly recommend you look for them and purchase them with one of those handy dandy 40% coupons that come in the mail. They're great! ;)

Just in case you are new to my blog - I've called these my homework blocks, b/c they are for making 8" finished My Blue Heaven Blocks that my friend Crazy'boutquilts and I are making for one another and mailing every so often. :) They are not that hard to make... at least not if you've done you homework that is! ;)

**In case you've missed it the block we are making is from QuiltersCache, designed by Marcia Hohn. ;-)


Love from Texas!

Tuesday, June 9, 2009

still working

I bet some of you are wondering what happened to me... Last week was a great blogging week for me - I think I posted everyday and one day twice even! :) whoo hoo.. but this week is a different story.

I'm here and I've been busy too just too busy to post photos and blog entries... but I did remember to take a few photos. I sewed noodles into light/dark pairs.

and turned them into these... 2 patch segments paired up with other 2-patch segments ready to become my scrappy 4-patches for Bonnie Hunter's Christmas Lights Mystery (Part 1 of 3)

I have several swaps and projects in the works that I'm gonna be working on soon (soon as my Keepsakes fabric arrives) and so these will become my and since there has been some great discussion over on the HGTV boards about Bonnie's Leader/Enders system I'll share the link here with you if you want to read how it's been working for some of my friends. Gardenpat has really been productive and shared several photos as did a few others :) So enjoy the show-n-tell! ;)


Love from Texas!

Friday, June 5, 2009

Mystery Report

Good news! I had a very productive night tonight... wow after squaring up all of these units I'm amazed at all the many Bonnie fans who have labored to make the past mystery quilts she's created... I thought I'd never get done squaring these boogers up - and this is just for a "throw size"

I really have a whole new appreciation for all you who have gone before me in the Bonnie mysteries ;) WOW! Tonight I kept telling myself, if they can do it - so can I ;)

This is the "Gold" fabric that I pulled yesterday that I thought would go perfectly with the green and black fabrics..... only today I read over the fabric yardage - and it calls for 1 & 3/8s yard.... and my gold is only 35" :( and sadly I do not remember where or when I bought it....? Maybe last year when I was in KY visiting Granny's Attic?? I'll send Karen an email and attach this photo - I'll cross my fingers, legs and toes.... :P

Until I hear back from Ms. Karen - guess I can get started on my unit 1 blocks -the scrappy 4-patches... which I'm hosting a swap for over on the HGTV boards :) the big question for me is... do I want to use those 3 fabrics in the photo above.... in the 4-patches??? or perhaps some of these noodles I have here below???

scrappy - two lights with two dark fabrics... hummm what would you do?

Guess I'll sleep on it and decide tomorrow... I'm still waiting on my White on White fabrics I ordered from Keepsake Quilting... so until they arrive Christmas Lights is at the top of my list of things to do...

Christmas Lights Part 1 Progress Report:

  • Unit 1 = scrappy 4-patches - what I'll work on next...
  • Unit 2 = DONE :)
  • Unit 3 = waiting on finding more of my gold or a new gold...
  • Unit 4 = DONE :)
  • Unit 5 = DONE :)

06/11/09 EDITED TO ADD: My friend Crazyboutquilts emailed me a link to my fabric I'm looking for!!! Whooo hooo! Thanks Sandie! and I'm double excited that it is on the Joann's website - that means I can use a coupon for it too! ;) Thank you!

Love from Texas!

Thursday, June 4, 2009

thankfully there are no rules in quilting ;c)

No rules....Except to have F*U*N!! and that is what Nora and I did today while the babies napped. ;)

The instructions showed cutting odd sizes of squares and then cutting into triangles and again on some of them... and all that scares me... so I used my brain and came up with another way to make the same thing :c) - remember no quilt police... and we all know there's more than one way to get the same end result... ;)

So I increased my sizes... and cut 4.5" squares of my background and also the black and made some ole fashioned HSTs...

and then cut some green 4" squares and turned all of those HSTs into these...

Ta -Da!!! Look very little waste! and each of these HSTs yields ONE unit 4 block ***AND*** ONE unit 5 block at the same time! Double Yeaaaa!

The *important* thing to remember is: to line up your ruler perfectly in the center before cutting to the 3.5" size... Here you will see my ink pen pointing to the 1 and 3/4 mark on my ruler. Just line that up each time and you're set!

you can click to make it larger to see... ;)

all lined up and ready for marking the back sides of the green fabrics... this handy "add a quarter" ruler worked perfectly for this...

Nora had fun playing with her doll house while we were in the dining room.. Oh how I love to overhear her conversations she has with these dolls... ;) it is so cute!

and this is as far as I got during nap time today..... oh and I know I'm a little backwards and all of this sorta confirmed it today... I skipped over units 1-3 and went straight to making units 4 & 5 - odd ea? :P Actually I found out that the perfect gold fabric I pulled from my stash was not larger enough... booo hoooo... so I need to figure that out before I can work on those...

To be continued. :)

Questions about the Bonnie Blankets...

EDITED TO ADD: I was asked how far apart I sew my rows... and thankfully I had taken this close up. I use my walking foot as a guide when I'm sewing. On my Bernina, I move the needle all the way over to the far right and then keep the foot lined up with the previous row sewn. Approximately = 3/4" apart.

Crazy'boutquilts left a question for me on a previous post asking me how many layers of plaid did I use....I wanted to share a post about it here in case anyone else was wondering the same...

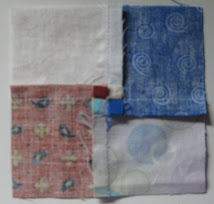
How many layers of plaid and how many yards? In this one I used 2 layers of each the plaid and the Tinkerbell fabrics. The Tinkerbell was doubled b/c I didn't want the wrong side peeking thru on the front... so I laid it out face down and then folded back over top of it with the pretty side up... before layering on the homespun type fabric that was plaid also doing the same.

Total purchased was 4 yards of each fabric the plaid was on the clearance table that day we were out and about shopping during our hurricane evacuation in Jackson Mississippi last September and all that was left on the bolt was 4 yards so I bought it all for under $5!

In the past when using flannel - I seek to find and buy the 60" wide when I could find it as it makes for a much more comfy size for an adult (but hard to find so most times I can only find the 42" which is perfect for children sized blankets) and likewise you figure out how long you want it to be and then multiply how many layers by that...


When I use flannel I only use a total of 3 layers. Sometimes all the same fabric other times the 2 cut pieces will be all 1 piece folded over... and the backing fabric a different flannel...that coordinates. ;) When shopping I like to use plaids b/c not only do they not have a "wrong" side... after they are cut up they appear more colorful but still show the plaid design when held up at a distance ;)

For a niece I did use a Strawberry Shortcake flannel and layered her uncut side like I did Nora's so that it wouldn't' have a dull wrong side peeking thru the cuts... That was the only time I used 4 layers of flannel... and didn't have any extra bulkiness than my usual 3.

HOWEVER - note when working with flannel - you will need to clean out your stitch plate and bobbin area often as it produces a lot of LENT!

Also when you buy your fabrics - also select your thread at the same time... I pull out 3 or 4 and unwind about a foot and lay over and then step back. The thread that disappears the most against the backing fabric wins ;) and I buy either the largest spool they have or 4-5 spools of the smaller... You will use a lot of thread on these.... so if it is not on sale then write down the brand and color number and go back when they run their threads on 50% off ;)

hummm, looks like I almost have a tutorial going with just this reply to Crazy's question... LOL anyone else have any other questions? To see more of my "Bonnie Blankets" I've made click here to where I shared some photos a while back. I only wish I have photos of all the ones I've made. :(


Nora's Tinkerbell ended up measuring 67" long -I lost 5" after squaring up - it does shift a lot during sewing... Still plenty long enough for her or anyone lucky enough to cover up with it. This isn't really a blanket for warmth as it is very light weight with the homespun fabric.... but a good summertime quilt for her toddler bed she is still in ;) or to take along for a picnic outside... or even the beach/spray park to spread over a picnic table or use to sit on...


The more you wash them the more they frey each time and softer and softer they get. ;)


Again, I sure wish I could find a long arm quilter out there to hire by the hour to sew the lines for me..... any long armers out there reading this and would like to give it a try - Please contact me! I'll pay ya! I have a Rubbermaid full of plaids... and would love to get some made to give as Christmas gifts... this year or next... or next.... ;) I'd even be willing to no only pay you for your services but to let you choose one to keep for yourself! After you do all the sewing, I'd pay you... and you ship back to me and I'll do all the cutting and binding... and mail yours back to you to keep ;) I'd love to find someone who would be willing to sew one of these up for me every other month.... just wishing out loud here. ;) as like I said I have a HUGE Rubbermaid tub full of fabrics for these...and also bought matching threads... ready and waiting... and waiting....


anyone wanting to make one of these themselves -if you have any other questions just give me a holler - I'm always more than happy to help!

-------------------------------------------------

While writing this Jessica emailed and asked: "So, let me get this right. Its just two pieces of fabric, quilted together with straight lines and then the backing piece is cut between the lines? Then bind as usual? I think I can do that!!"

To which I replied:

Yep, you about got it ;) Nora’s was just 2 pieces of fabric both folded over into 2 layers each…

For my plaid flannel blankets I’ve used all one piece and folded it over so that it layered 3 times…

One thing I forgot to mention when you spread it all out and smooth out the wrinkles then pin every 6-8” or so – about the distance of your hand in-between… and I do this with the back side UP.

Because on my machine the top stitch looks the best… and the back of your final blanket will not be cut… so you want it nice and smooth and pretty stitches…

Where as if you sew a wrinkle into the fabric on the underside – that is gonna be the cut side later and will not show up ;) make sense?

Oh and I use a walking foot… ;) and move my needle over and use the foot as a guide for my rows… and important – you must sew along the bias… so that over time the cut apart rows don’t ravel all the way out.

Gosh, I so need to do a better job ea? Of explaining things… geesh! LOL

Thanks for visiting my blog ;)


Love from Texas!

Wednesday, June 3, 2009

Look what I finished up tonight

I bet my readers thought that with this Bonnie Bug that bit me this week that I'd abandon this and jump right into cutting of the fabrics for the Christmas Lights... and it was tempting especially after I visited my sewing room early this morning and pulled some great fabrics... but when I went into the dining room where my machine is... there was this thing sitting there with the folded up light blue star fabric - ready to be cut for the binding...

So I got started and cut some binding strips and then sewed together and pressed... and then took everything to the kitchen floor to square up the piece and pin the binding down. (Jayardi I hope you didn't just read that... yep I know, shame on me for using pins. I did actually buy a bottle of school glue but put it up so Nora wouldn't get into it and FORGOT where I put it... shame on me I know - please forgive me)

(above pic. was before washing) Yes, I attached the binding on by machine and also stitched it down with machine. I have no plans to ever do binding by hand again unless it is for something *very special* I loved Jayardi's class she gave on machine binding at the COF Retreat in Manchester, NH in April :)

and after supper, and after giving the kids a bath - here I am with Olivia... Wish I looked as cute with messy hair as she does. :P Anyway, after bath, books and prayers... and of course kisses...I came down stairs and finished stitching down the binding and then threw it into the washer for a quick Rinse & Spin Cycle with fabric softener so it will smell good for Nora tomorrow... and then ran it thru the dryer... and Ta-Da!

Take a look - it fluffed up real nice and soft. No matter what angle I held the camera I really couldn't capture a true photo of it... it is very soft. ;)

...and even if Nora is not excited (which I'm thinking typical her will change her mind) but even if not - I'm excited!!! Whoo Hooo a Finish! Now I can move on to other things!!! ;)

Love from Texas!