>

Pages

Showing posts with label pillowcase. Show all posts

Sunday, June 19, 2011

current Projects

Some of you might remember the pillow cases I made for each of my kids for Easter. Well now it seems I can't go to walmart with them and not go down the isle with the fabrics.  They all think they *must* show me and pick out their most favorite fabrics... and they do! :)  So here's a look at what I'm working on for their belated birthday gifts. 
Not sure if I'll make up the one with Barbie fabrics for Nora or not since she's YET to even like even one single pillow case I've made for her :/  She says, "They're just not as soft Momma" and to that I can't argue with that...  So for now I'll just enjoy that the twins both la,la,love anything I make them for their beds! :)  Aren't these robots too cute!!!  and lesson learned on the directional fabric of the Carebears... but Olivia will never notice :)

And since JudyL's Design Wall Monday is just around the corner - her's a look at whats still on my design wall and floor...  both projects that seem to be taking me forever to finish up....


I keep reminding myself that it doesn't matter how long it takes to get it done... just matters that I get them done! Right?

Love from Texas!

Tuesday, May 24, 2011

walmart fabric

I guess it's been at least 2 or 3 years now since walmart started pulling fabric departments out of their stores.  Each time I've shopped over the past year, I've noticed a significant change in our department. Getting smaller and smaller each time I'm there.  Down to just the back wall and one other section for thread.  Well in recent months our store under went a WHOLE STORE REMODEL.  I'm talking - moved departments from one side of the store to the other and new floor, layout - I no longer know where anything is...  So imagine my surprise when I rolled my cart around the corner and found this.

Three isles of fabrics!  WOW! I would have never thought that they'd still have a fabric department - especially after the whole store remodel, but that's cool with me!  It's still one of the few places to find lisconsed cartoon characters like Carebear, Spiderman, Dora or Little Mermaid fabrics.

They even have a small section of precuts - trying to copy the idea of charms, and jelly rolls only these fabrics are SOOOOO YUCK!  So thin, I could see thru them without even touching them to examine.  Nice try, but no thanks. 


There were these batik strips that might be OK. Love their colors... but right now I don't have a need for them.  I do have a need for one of these two bolts though the brightness sorta spoke to me...  I didn't have my Round Robin Quilt with me, but wouldn't one of these make a fun backing fabric to use??? Can you guess which one came home with me?


I still think that if anyone who doesn't quilt but would like one - would be better off to just go to walmart and buy one.  $19 and you choose T, Q, or K size!  You can't even buy a rotary cutter for $19!!


If you guessed the fabric bolt on the LEFT in the photo above - you would be right!  The one with the purple swirls on the bright pink batik... I think it will work perfectly for my backing on the Round Robin Quilt.  I laid it out on the kitchen floor and the colors looked perfect.

Guess what else I bought.  Actually I went back the next day, the kids with me, so they could pick their own fabric for future pillowcases.  Paul Thomas chose robots, Olivia chose Care Bears and Nora wanted tie-dye peace signs.  Can you tell they are excited about new pillowcases!? lol


I also spotted this book - which I took a photo of to help me remember the title. 

Have you heard of him or seen this youTube video from one of his inspirational talks to school kids?  I saw it shared on facebook sometime last year and was really touched. How great it would be if everyone had his attitude in life.  I want to finish up the book I'm on and then add his to my new Nook Color soon.

HERE is his interview video while interviewed by CBN.COM and more videos click HERE


Love from Texas!

Thursday, March 17, 2011

My first sausage pillowcase!

Remember that youTube "sausage pillow" search I sent you on yesterday... well take a look at what I worked on last night (after midnight I might add...)

Seriously.... despite what you're about to read below - this was THE. easiest. project. ever! The only part that takes some time is lining up all the edges and pinning and pinning... and .... you get the idea - but that's not hard... :)

And off I go - on my NEW "Olivia" Arrow Sewing Cabinet which I la,la,LOVE!!! Weee....slow for a pin, Weee...slow for a pin.... all the way to the end. Then time to pull the "sausage" out of the tube. Easy Peasy!

All was going great. Just as I had remembered from watching the video. Pull, pull, pull... and then I noticed something.

I have to be honest - I shouted, "CRAP!" (but not too loud the kids are sleepin next door) When I noticed that I had pulled out of my tube and discovered the wrong side of the pink fabric attached to the right side of the stripe fabric. :(

I immediately stopped pulling and stuffed it back then began frog stitchin - rip it, rip it... that whole 44" seam. :( What did I do wrong? So I went back downstairs to rewatch the youTube video again... in hindsight, I should have went and rewatched BEFORE using the seam ripper.... b/c can you guess what...

I had actually sewn it CORRECTLY!!!!!!! :/ Yep, all that rippin just to put it back exactly how I had before and RESEW. Remind me to not sew anything after midnight again please!

Good thing all those thready, ravely edges will be completely hidden when I finish! :)


Yep - it's suppose to look like this - cuff right side showing and the body of the pillow (my pink) wrong side showing... b/c what you're actually looking at is the what will be the INSIDE of the pillow! :P

What matters is the other side - the side with your accent trim strip. If all the fabrics on this side are right side up then you're GOOD TO GO JOE! ;)

Just two more seams to sew.... pretty side up sew .25" seam down the long side and pivot and sew across the bottom.... then press and then trim with your rotary cutter and ruler 1/8th" off the seam you just sewed... then turn inside out and resew another .25" seam (French Seam) and turn again and your DONE BABY! :P

For me it was goin on 2:30am... yeah I know. I know. and trust me I paid for it today. But oh what a great feeling to take it and put it on the pillow beside Nora sleeping in her Queen sized bed..... and this morning when she woke up and saw it! :) "OH THANK YOU MOMMA!!!!!!!!" as she squeezed my neck good morning!

Yep, totally worth it :) My only regret? Not having the camera with me this morning to get a photo of her with it. Well maybe 2 regrets... I regret ripping that 44" seam...

So don't make the mistake I did. OK? :) OK!

Love from Texas!

Tuesday, March 15, 2011

Meet my new "Olivia"

Sorry to have kept everyone waiting - but I was wanting to get things cleared out of the floor a bit before taking a photo of my new "Olivia" Arrow Sewing Cabinet that I won from their facebook fan page.
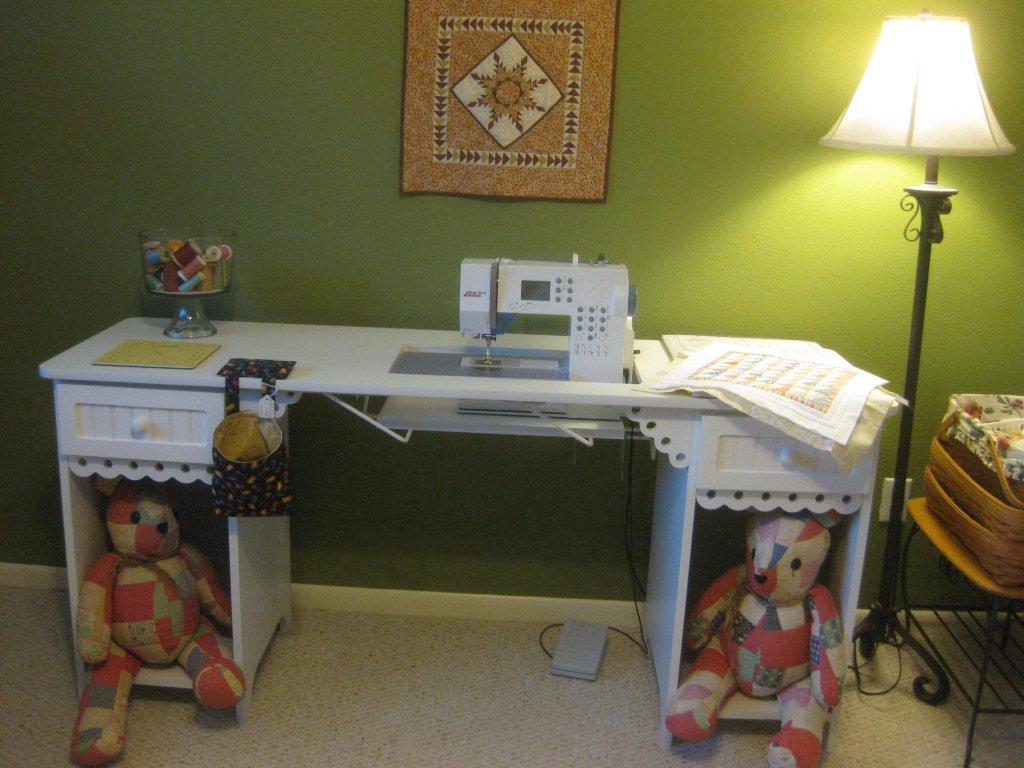
The sewing room makeover is still in progress but here's a sneak peak.
Those open spots are designed to fit a second machine or serger - neither of which I own. I did buy some stackable baskets that fit in there. However at the time I took the photo, they were downstairs in the dining room binging loaded up of stuff to carry up to the Happy Room.
I couldn't "BEAR" the cabinet looking so empty so I grabbed these guys... Quilt Cut Up Bears that my "Momma Newt" made for me when I was 18. The twin quilt bears have their own special story to tell - but I'll save that for another day.
Take a closer look - my Bernina (aka Bernie) all nestled into his new home.
I even got David to change the light bulb in my machine. I have to confess that I bought it back in August last year when I took Bonnie Hunter's workshop at our guild but had no luck removing the old bulb from fear that it would break off in my hands b/c it was in there so tight... and b/c my machine was cramped up in the bay window of the dining room, I just lived with it rather than have to take a lecture of the husband's complaining of the messy dining room if I asked him to go in there to help.
Thanks to my new "Olivia" things are looking great and I can tell it's gonna help me be more productive in my projects and also bring a lot of peace to our home with everything out of the dining room once and for all!
You wanna know one thing that I really like... the drawers may be too tight for other's liking but for me they're just fine. I have two 3 year olds who I know are gonna be quite nosy once they see the new table with stuff on it. David offered to take them back out and readjust them, but I told him to leave them as is for now :)
The drawer on the left isn't as tight so I didn't put any pins in there. Instead my DMC floss collection and machine quilting gloves. I'm sure it's a lot like a new kitchen - things will get organized and REORGANIZED until I figure out where I best like everything to be. :)
As for photos of the rest of the "Happy Room" you'll just have to wait for now. I still have several more things to carry up from the dining room downstairs but as you can tell from the photo there's no more cutting mat, ruler, or machine or iron in there - so my sewing days in there are OVER. ;)
Nora has several classmates with March and April Birthdays coming up and it's about to break the budget taking her to shop for them. We ran out of wooden dolls that she usually loves to gift so a trip to Joann's was in order to pick up some more. While there I also picked up these fabrics to use for pillow case making.
I'm sure if you've flipped through any quilt magazine in the past few months, you've seen the ads for APQ's 1 Million Pillowcase Challenge. "Make a pillowcase. Make a difference."
Have you seen the Missouri Star Tutorial Video on the "Sausage Pillow Case" yet? I watched it for the first time a few weeks ago and thought - I COULD DO THAT! So we're gonna find out soon! :P and if all goes well, we'll be making each of the girls in her class a new COOL "Peace Sign" and flowers pillowcase to wrap up the wooden dolls in and tie with pretty curly ribbons.
I also watched this tutorial youTube video too.

Making a Sausage Pillowcase with Judy

Although her measurements are slightly different, the overall total is the same.... and since I don't have a serger, I love that she shows how to make a french seam! I love the ending where she sighs a big relief when her friends clap for her :P
Stay Tuned...
Love from Texas!