
I heard two voices sweetly begging me to go to the Happy Room today and when I approached the stairs this is what greeted me.... ;) How do you say no to that? And after all, I've got some tiding up to do before I can get started on the sewing room makeover...... and from looking at my watch we had 2 hours before time to go pick up Nora at school...

So while they played, I cut up a few shirts... and since I had my camera with me I took some photos in hopes that this will help other Quiltville.com fans in their shirt deconstruction... It really can be fast and fun!
The 3 things you must have to make it fast and fun are -
- a cutting mat,
- rotary cutter and
- Fiskar's "spring" scissors.

I always start by laying out the shirt as if I were getting ready to fold it... face side up. and rotary cut on each side of the arm seams. Doesn't even matter to me if I'm close or not... I try not to be close on purpose to avoid hitting that bulky seam - not only does that slow you down but could dull my blade faster than needed... remember - the whole shirt cost me only $0.50 so I'm not hung up on saving every little cm of fabric.... Close enough is... close enough :) Cut the arm off then move down to the cuff.

Slice! That takes 2 seconds... flip over and grab Fiskar "Spring" scissors... and chop, chop up the area that you button the cuff... 5 seconds tops.

and hang on before you move on to the other sleeve... one final step - SLICE up the seam that holds the sleeve together.... another 5 seconds. Easy Peasy! ;)

Now you are ready to reposition the shirt and make the same cuts to the other sleeve.
Next, I like to start at the shoulder and cut over to the collar. Repeat on the other side.

cut all the way out to where you button up the shirt. Snip, snip, snip! :)
Then you're ready to fold out the fronts of the shirt - where it's open like this..

Then I make a rotary cut along where the "yolk" I think it's called? In the center you may roll over a big BUMP aka pleat - if so either cut above, below or grab the Fiskars and snip over it...

Now that the yolk is gone - readjust to work with where the "shirt back" meets the front pannel (either left or right) and make a snip along both sides of that seam.... now pick up and RIP! RIP! each of your snips! :) This is the fun part! Repeat on the other side.

Then I flip around the shirt so that the shirttail is on the mat... and use my rotary blade to roll around that bottom hem. Fast and easy... :)

Repeat cutting off the shirttail hem on the front panels of the shirt parts using your rotary cutter. Then snip beside the buttons and button holes and rip them off! :) Love that sound! I end by grabbing my Fiskars and cutting off the buttons. Snip, snip, snip, snip, snip, snip, snip...

I do not worry with the threads or any tid-bits of fabric left on them. I'll worry with taking those off WHEN & IF I ever need to use the buttons! The kids love playing with them all the same and I bet some of it will fall of from their pretend baking and money exchanges. ;) Plus I have things on my "to do list" to spend my time on - not on using a seam ripper to cut off threads!
As you can see from the pile above - very little waste... and I didn't time myself, but very little time too! :) Moving on to the next shirt.... Ooough! Aa nice Docker's brand... too bad it's only a L and won't fit the hubby. :(

Speaking of buttons - I just heard a spill behind me... Ought-OH... time to pick up!

Today I cut between 15-20 shirts in less than an hour. The only parts I folded were the "shirt backs" the rest went into a bin to be cut in to strip sizes at a later date and filed into drawers according to size and light or color. ;) like Bonnie Hunter's Scrap Users System.

Wanna see some of my "shirt backs" collection??? Here's just one diaper box... and one drawer.


So here are a few more photos I took of Paul Thomas & Olivia here in the "Happy Room" today. Won't they love it once I get a small kid sized table for them to sit at here with me in the sewing room..
Oh and here's one more thing that I bought for only $0.50 at the Goodwill... a denim skirt for Nora with shorts built in! It's a size 8 so it will have to be put into our "waiting to grow into" bin :)


and guess who la,la,loves to use the iron!!?
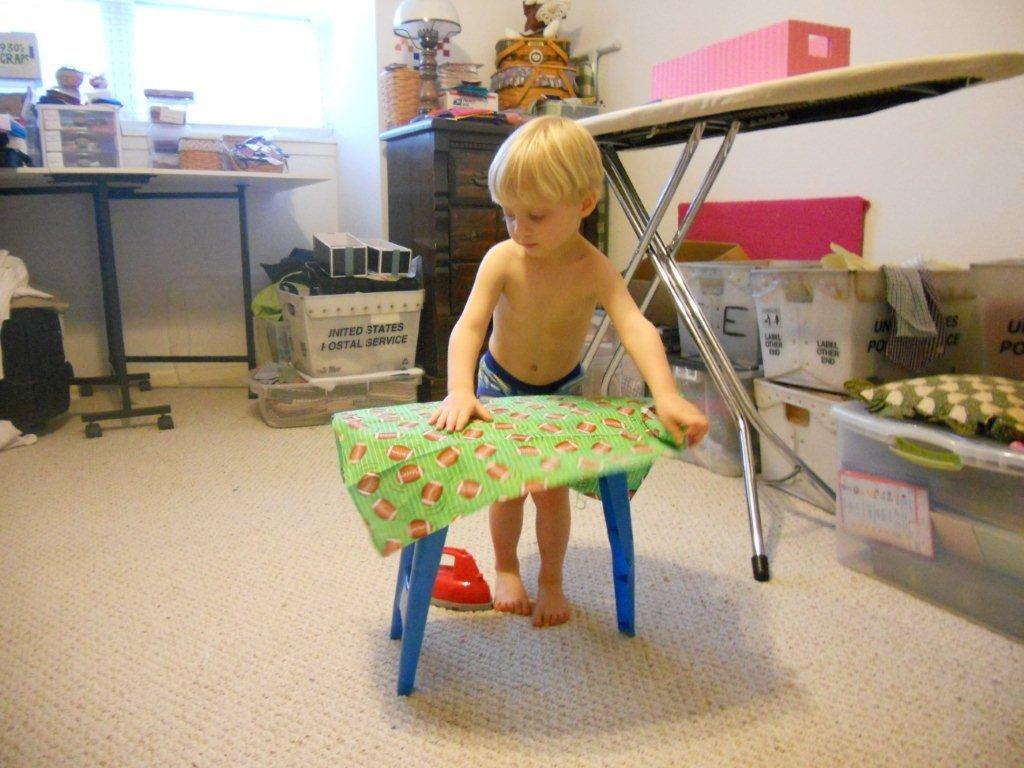
Not a real one of course... actually he calls it "doing his homework" and he does a great job. Spends just as long getting it ready, straight and no wrinkles as he does ironing it :) The last time we were at Joann's I let him buy this football FQ and he has ironed it at least 4 dozen times!

Sometimes he gets a little frustrated b/c the plastic ironing board tips over easily... and it doesn't help that he thinks he has to be sitting down to iron... guess his legs get tired standing with all the time he spends on it. lol


Here he is getting it straighten up again for the 13th time.... and all the while Olivia is dancing and twirling around the room.... yelling LOOK at ME! LOOK at ME!


I love those little piggies sticking out in the photo above left to help hold it from slipping off the edge.... I'm telling you he could spend 30 min on this! Too bad he's not old enough yet to really iron! One day little brother..... one day!

Finally. Either he's ironed it enough that it meets his satisfaction or he just can't resist any longer... he calls it a day and jumps up and joins Olivia in a round of Swing your partner!

.....Or this could also be observed as just run around your sister as fast as you can and if you knock her over and she doesn't cry then I won't get in trouble and then I can laugh! .......if she cries quickly yell I'M SORRY! then repeat!

and here's one more photo that I have to share.... the perfect ending to my day. Nora reading a bible story to me! :)
Love from Texas!


I had to laugh at your twins' dancing! The shirt process was very informative. I haven't bought any at our local thrift store because I was unsure what to do with them. This helps. I also had to laugh at one of your instructions that said sh*t instead of shirt! Something I would so do!
ReplyDeleteWhat a wonderful post and I love all the pictures too.
ReplyDeleteYou are lucky to be able to buy shirts in the US that cheap, wish we could here, they still want $ 5 and more love all your fabrics just great.
cheers
Christine
Was looking thru some of your pictures and wanted to say SAVE a pair of those undies your little guy is wearing. You'll want to make a t-shirt quilt and believe me...those undies make a cute addition when they're 20 yrs old!
ReplyDelete