Guess what I was doing on the driveway when the mail lady delivered this box?

I was almost finished trimming off the excess batting and backing off the 4th side of my Quilt for Kids quilt today when the mail lady pulled up and delivered me a bingo package. ;) At least now she saw me doing something quilty - so that's PROOF that I really am a quilter to her LOL :P

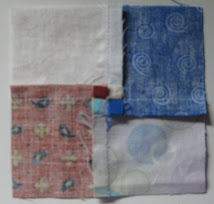
They don't included binding in the Quilt for Kids KITS - but the backing piece is large enough so you can fold over from the front as they suggest in their directions... but I measured and found that I could cut 2.5" strips from left and right sides and there were 5" widths that I cut from the top and bottom and then split into two 2.5" from each top and bottom for binding.

However on 1 of the strips wasn't quite 2.5 UNLESS I included the selvage. But I had to have it - or there would not be enough to go around my quilt...

This is THE ONLY TIME EVER that I have purposely included the selvage in anything... but don't think bad of me just yet - even though you see that the white is more than 1/4" - you will have to trust me that it will never show... just wait - I promise! k?
Maybe this next photo will help you to see where I'm going with this...

Oh, and haven't I showed you my binding buddy before... it's not really called that - I've just nicknamed the Fons & Porter Triangle Trimmers that - I picked them up 40% off at Joann's sometime last year and have just recently realized they are actually so very handy for more than what they were designed for!

that little strip of fabric is my buddy too - sorta like a cheat sheet! ;) I wrote on the fabric some tips and reminders. But see that red F&P Triangle trimmer - I lay all of the 2.5" cut binding strips together - all right side down... and line up my tri

then pick them all up turn the uncut ends to where I just picked up the cut ones from - and again laying them all together - all right side down.. like my fabric above is - use the red trimmer the same position and make another cut.
done. ready to take them all inside and sew them together... stay tuned for part 2!
EDITED TO ADD - here is another photo showing you just exactly how to place your strips to sew them together into a very long binding strip... after you get them all joined together, take it to your pressing station and fold in half and press wrong sides together.

- Click Here to take you to Binding Tutorial PART 2


I managed to squeeze out enough of my backing on the QFK kit to make binding also.
ReplyDelete