>

Pages

Friday, June 27, 2008

How I make my minis - Part 1 of 2 Tutorial

I've never made a tutorial post before so please bear with me. Also for my mini 9 patch swappers, please accept my apology for posting this soooooooooooo long after I promised I would.... uham, months ago... but better late than never right? ;)
Please feel FREE to cut and paste into a word document and edit as you see fit to save for future reference :)
The first time I tried making a mini 9 patch using he strip method, I was shocked after all the hard work and time spent pinning to get perfect seam matches... only to find that my block did NOT measure 3.5" I don't remember the exact measurement but it was a LOT off! Not usable at all - and sadly it wasn't just one block but about a dozen unusable blocks.

So I got to thinking - there has to be a way to cheat - or rather make a tad bit larger then trim down to the perfect 3.5" measurement! :) Here is what I came up with:

First off, I usef different sized strips of white and different size strips of color. The fat strip on the left is cut at 2" - and the skinny strip on the right is cut 1.5"
Now, I join them fat, skinny in the middle, and fat again according to colors.
Above photo you see the skinny 1.5" color strip in the middle that will be our center row for our mini 9 patch.
Below in the photo you see a skinny 1.5" white in the middle - these cuts will the be the top and bottom rows of our 9 patch. Also I learned that when sewing the strips into rows like the ones above - it paid off to sew slow and steady - do not put the pedal to the metal or you may end up with little tucks along the way. OH, also I pin about ever 4 inches or so. Sorry forgot to take photos during those steps. See my long rows... These are from cuts from selvage to selvage. From these you will have enough to make 11 mini 9 patches... (we're swapping sets of 10) and some extra left over from the strip set on the left to use if you want to make more for yourself....you'll need to make another color,white,color set to go with them...

Now, It's time to cut off some sections. Rows for the 9patch. We'll start with the strip set on the right and cut them into 2" segments. These will be the top and bottom rows of the 9patch aka row 1 and row 3.
First I start off by getting a clean cut from the strip sets....Then cut segments 2" wide each all the way down the row... TaDa! To make a set of 10 minis for the swap, you need a total of 20 of these.. or more if you are making extras to keep. and b/c yesterday when I started this post I cut the other set at 2" MISTAKE... I think I can use them anyway and trim them the white, color, white set to the 1.5" size that they should be.... so here goes. See my ruler is set to the 1.5" mark...slice! You can avoid all this extra work if you just take your white, color, white strip set and just cut 1.5" segments. These are the center rows of your 9 patch and you will have enough fabric to cut 10 segments for the swap and a lot left over for more for yourself... all you need to complete them is to make more of the opposite sets to go with them. OK, here are rows 1, 2 and 3 ready to be sewn together. The important tip here is to USE PINS at the seams to get them to match perfectly!!! ;) It doesn't take as long as you may think ;) and you'll be glad you did! I place the skinny 1.5" row face down on the top when I sew them...Also, I either leave in the machine the last set or if I want to cut it off to press it now, I use a scrap runner (the blue/pink small scrap) to sew up on and stop with my needle down. Or if you have read about Bonnie Hunter's leader/ender project, you can do that too! ;)
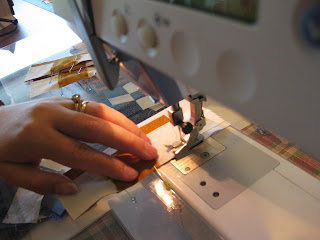
OK, here's the two that I just sewed together... ready to press. First I flip them over so that the fatter sections are on top - this will allow the seams to be pressed outward (away from the center square) like I like :)
Next, I warm the seam or also known as setting the seam... then open it up and press to the left - this will make the seam go away from the center square.

Now ready to grab two segments of the color, white, color and grab the pins again and attach the 3rd row to these babies...
There, got them pined... ready to sew and press. ....remember pinning makes them perfect! ;) While I am finishing up Nora is "cleaning up her buttons" across the table from me. ;)
ready to press open .....Yes, all three rows are together - you can't see them all from the photo but that center skinny row is under there. Trust me :)
TaDa again! they're sewn and ready for trimming... but that will be part 2 to be posted tomorrow.
I hope you were able to follow along and understand about where to place 1.5" strips and where to have 2" strips. Once you get the hang of that - everything else is easy! :)
I promise tomorrow's trimming post will not be as long. :)

Edited to add the link to  Part 2: Mini 9 Patch Squared UP

Until then.... Love from Texas! ~bonnie
Thursday, June 26, 2008

Well turd, I can not post the post I wanted to Post


Today while the babies were napping - I spent time taking step by step photos to make a blog post on how I make my mini 9 patches s a little larger then trim down to the perfect size...and just now as I am posting the part 1 - I see that I did it WRONG!

I cut the wrong set at 1.5" and the wrong set at 2" they are backwards! URGH! Everything was looking good before I started cutting!**see photo above**

Well, there's no use posting it public yet- don't want to confuse anyone - so tomorrow I will redo it with another color set.... maybe tomorrow I can post it.... all the wording is done - just need new photos that are correct!

On the bright side, maybe this time I'll get some photos of how I pressed the seams too? as I had forgotten that part. ~bonnie

Love from Texas!

Tuesday, June 24, 2008

I AM Speachless

I can't ever remember a time that I was so surprised that I was speechless... (OK, one time comes to mind from high school... but that is another story for another time.)

Tonight I was completely speechless! I was wanting to squeal and inside my head I could hear it - but here at my computer I sat with my mouth gaped wide open and my hand up over my heart. I got up and as I carried my mail into the den to show David what I had just opened up and read, I actually began to tear up thinking about all the thoughtfulness behind this very special gift!!! :P


LOOK AT WHAT I OPENED UP!!!


This year's winners of the HGTV Fat Quarter Bingo all went in together and collected money for me to apply towards my 2009 Circle of Friends Retreat expenses!

Here is what the Certificate reads, just in case you can't see it from the photo:

"Certificate of Appreciation
presented to
Bingo~Bonnie
from the 2008 HGTV Bingo Winners
In recognition of the outstanding job of bingo hostessing you have done, the 2008 winners present you with this certificate worth $140.00 on your 2009 Circle of Friends Retreat expenses.
We love you Bonnie! Thank You!!
*please redeem with Nickilee"


My friends at the HGTV Quilter's message board sure are creative and sneaky aren't they - and THE BESTEST online friends ever! :)

TY, TY, THANK YOU! to all of you who contributed to my 2008 FQ Bingo hostess gift! You have made my day/week/month/and even year! :c) This was super generous of you and I appreciate it so much! I look forward to meeting you all in NH next spring too!!!

I also enjoyed the personal notes from quiltnanny and LisaP8 and YES, crazy'boutquilts, you DID, certainly, in fact, surprise me! LOL :c) Thanks again!


Love from Texas!

Monday, June 16, 2008

Wanna "Flip" a "Floppy"?

Funny title hua? Are you wondering if I'm giving away a flip flop???? no, but there is a give-away going on .... as in a blog give-away... and being corny I thought that would be a good way to describe the prize up for grabs! (I think of the silliest things while I am sitting breastfeeding)

See, finished tops are often referred to as flimsies - in this case a floppy... play with me here - it's floppy if it's not quilted, right? ;) and often on the HGTV shows they are flipping houses, getting them fixed up to sell again... so.... Jackie's prize for her blog-give-away is you can win one of your quilts to be quilted for FREE*!!! She will even provide the batting and pay for shipping to return it to you, all you gotta do is get it to her. (*up to a twin size)

So if you want to "Flip" one a "Floppy" you have stuck in the closet somewhere head on over to Jackie's blog at Canton Village Quilt Works and check out her post from 06/14/08 where she gives all the details on how to go about signing up for a chance to win! You have from now until her Birthday 6/23 to enter :)

(((Jackie, posting a good blog entry and link should qualify as an extra entry don't you think??? Rather than a simple one liner... aaahhh, I can dream right! LOL :c) )))

Love from Texas!

Sunday, June 15, 2008

Blog-give-away ALERT

OK, you will have to be quick if you want to enter this blog-give-a-way. SweetP over at Coffee Time Studio is having a "container contest."

She wants to see what creative container you use in your sewing room. What is it, and what you use it for. Post a pic on your blog with a link to hers and you get one chance to win the prize for each day you do this between now and her 300th post.

Here's mine: a window box flower pot = perfect for all sizes of my rulers! (... sometimes a few miscellaneous items get thrown in too...)

She has also include several links on her blog to those playing along and it is fun to "go for a visit" to other blogs and see what they're using in their sewing rooms to contain their notions!
Don't you think you want to play along too??? I wish I had thought to take a few other photos while in the sewing room yesterday - so I can post one a day while the contest goes on... who knows when her 300th post will be??? Maybe I will think of it tomorrow... maybe not. Anyway, at least once I go leave her a comment with my link I will be entered once at least - and who knows, maybe that one chance will be all I need? ;)

Happy Weekend & Love from Texas!

Friday, June 13, 2008

test

Testing again to make sure the signature is not covering the words...

Love from Texas!

another minor change

Last night after the kids were all in bed, I got to sit down with my blog and make a few more updates. Notice that incredible long list of UnFinished Objects??? Honestly, I am not even sure if that is all of them... but those were all that were listed in my excel spreadsheet that I started a few years ago.

And as of today there is something else new - Am I on a roll or what? I now have a Live Signature Line like my blogging mentors JudyL, MaryJ, and THE Bonnie of all Bonnies! :p

And I even figured a way to add it to the settings so that it is already here in each of my post templates each time I come to post! I feel so cool!

Funny how it doesn't take much to make me happy. :P

Love from Texas!

Thursday, June 12, 2008

Good News - woo hoo, a wish come ture

Oh this is so cool!!! Notice anything different???? Yep, today I gave my blog a much needed update! and how about that header photo!!! WOW, I have even impressed myself! :P

With an software update of some sort (it said I needed it so I clicked OK) and about an hour of my time, wallah! I'm so pleased with my blog! For quite some time I have been wishing for a few "minor" changes. Like "label" listing and photos of the kids in the sidebar... and on and on...and thanks to a link that Crazy'boutquilts shared on one of her comments on Nickilee's new blog - I was able to go snoop around and learn some new tricks!

I'm not done yet... and I have seemed to have lost my lists -blogs, UFOs, and other stuff... but with time I will get them back ;)

Oh - and just in case you are wondering where the link is... http://magicwithblogs.blogspot.com/
This was SO SUPER helpful! I wish I had known about it ages ago!!! And I made all my changes in less than an hour. Imagine what I will come up with later on when I have more time to play around! ;P

Love from Texas! ~bonnie

PS - Something new is a blog list of my HGTV friends over on the sidebar. And something awesome, is that it arranges them in the top 5 that have made recent updates on their blogs! Isn't that cool!!! Go visit them and tell them I sent you. ;)

Monday, June 9, 2008

Stinky Quilt Update

Oh my!!! After posting just now, I scrolled down my blog and realized that I forgot to update my blog readers about my RWB Stinky Quilt!!!! Remember how I found it a few weeks ago - a top made by my mom... and as I was posting I mentioned how I wished I could get it quilted and use it this year for when we go home to 4th of July in Kentucky??

Well, I may get to! Following that post, I contacted my longarmer, Bonnie Hunter, and she said to send her my stinky quilt...that she'd have her gas mask ready! :c) Since I requested fast-n-easy quilting she is gonna try and work me in to her schedule!

The latest update is that on 6/2/08 she wrote saying it had arrived at her home... I know there is no guarantee that it will get done in time.. but there is a chance! and a "real" chance now that the stinky quilt is there at her home! How COOL is that!?!!
Love from Texas! ~bonnie

News

for readers who read both of my blogs- the following is a cut and paste :) ~bonnie


Good News, Great News, not so good news, & Bad news:

first the good news: Paul Thomas slept 7 straight HOURS Friday night! I went to bed the same time as the babies around 9:30pm after they were in their beds.... and Paul Thomas didn't not cry out until 4:30am!!! WHOOO HOOOO!

now, some not so good news: That same night, Nora was up twice :( with coughing and fever. I don't think she even knew I was by the bed trying my best to get her to take some Tylenol and although I didn't get the thermometer to know for sure the number, her head was extremely HOT - thankfully by morning it was gone.

and are you ready for the GREAT NEWS!!!??? Paul Thomas slept ALL NIGHT Saturday night and last night too!!! Could we be moving on to a new stage in life? I sure hope so!!! :P

and now the Bad news.... I sadly regret to tell you, last Thursday while David was playing in the floor with the kids after arriving home from work... he rolled over and SMASHED our digital camera and BROKE it! :( It was in his pant pocket with some keys - I know, I know...

Thankfully, it does still take photos but I have no idea what the photos look like until I upload them to the computer. Reminds me of the old fashioned way of taking photos - looking thru the viewfinder... *sigh*

Looks like we will be shopping for Camera number FIVE soon - as we can NOT live without taking photos! I hope to purchase one before our trip home to Kentucky so I can read all about how to use it before then.

So my question for the day is: Do you have a digital camera? If so what kind? What do you like/dislike about it??? We've only owned Cannon's in the past, but I'm open to other brands. Leave me a comment and tell me ;)

Love from Texas! ~bonnie