in this part you will learn how to make your binding strips attach at the beginning and end so that no one looking at your quilt later - even you - will know where it was started or stopped.
Remember last post when I shared a photo of how I had to use a strip with the selvage?? and I promised that even though the white was wider than 1/4" that it wouldn't show??

well since this is called a double fold binding technique... just be sure and place that selvage face up when pinning on the binding to attach to the quilt... then when it's finished you will be folding over it ;)

Did any of you guess that was what I was going to do? ;) See below how I pinned it onto the quilt. You want to make sure that the fold is pointed towards the quilt body and the cut sides lined up with the cut part of your quilt sandwich.

when you get to the corners - I take a few moments to really press it hard along the fold of the 45* crease - make sure that your binding is even across as your quilt's next side... if it's too high or too low then you've folded in the wrong spot.
Putting a crease in that binding now will help you later when you are sewing.

whew - I had just enough binding - had I not made the strip with the selvage work I'd been in trouble for sure! What you don't see in this next photo is that to the left side of the photo that is right at the corner... this is where I like to start and stop on a quilt. to the photo's left is a short side and to the photos top is the longest side of a quilt... you'll see later.

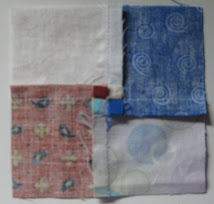
OK, time again to round up my little binding buddy I made... Just a quick look at him and I know just what I need to do next.

Not too often do I see the pretty green floral side -b/c most of the time I'm working with the wrong side of the fabric - and that is where i have written my notes! ;) I think you can click on the next pic to see closer what I've written on mine. I highly suggest you keeping a scrap piece of a binding and making yourself a "binding buddy" it really has helped me!!!

so are you ready to make our no show start/stop attached binding?

that piece on the right I just made a straight cut with my scissors near the middle of my unpinned part of my binding.... the left binding piece is still uncut -I placed my ruler over top of it and an showing you how I have it folded back over the ruler...

slide your ruler over to where it exactly butts up with that cut piece on the right

my binding buddy note said to subtract 1/4" from the width of your binding. My binding is 2.5" so that would mean I need to look for the 2.25" mark and make my cut on that line. Done.

and now so that these two pieces will line up perfectly when I go to sew them together, I'm going to agian use my F&P red triangle trimmer! ;) THIS TIME, it's important that the bottom right is lined up against the very edge of my piece...

Repeat for the right side too - and you'll notice that this time I've flipped the red triangle trimmer upside down... I'm not sure if it is showing up - but I drew diagrams of how the red triangle is pointed onto my binding buddy fabric piece as a reminder too ;)

and this is what makes my binding buddy fabric piece so awesome - If in doubt on which piece is right side up or pretty fabric down.. all I need to do is fold my helper to SHOW me! see in the photo below?
(*When taking photos, I forgot to mention or show after cutting stirps how I joined them - but this is the same way - from photo below line up edges and reffer to your binding buddy strip so you don't get confused on which piece is right side up or down)

So above you'll notice that I fold over the quilt so I'll have some slack in the binding that I'm working with and can join them to look like my "binding buddy" and I use one pin to hold it until I can walk it to the sewing machine...

and here it is at the machine being sewn together - this is why I prefer to start and stop where I did - nothing to wrestle with under the needle... works for me. (boy I hope I'm not confusing people by now)

and b/c I'm too lazy to get up and go to the iron... I simply FINGER PRESS this one seam that I just sewed.... and then I hold it up to make sure everything is A-OK... and Wa-La! It's perfect!

and because that was about an 20" unpinned space I was working with - I now add a few pins about a hand's width apart like I have all around the quilt already.

Now that you have attached your "No show start/stop binding" it's time to sew all of it onto the front of your quilt top. Before joining stirps I had already pinned all of the other sides of my binding.
So now it's off with Mr. Perfect (foot #57) and on with Mr. Git'er DONE Walking Foot ;)

Meet back here for Part 3 post soon!
- Click Here to take you to Binding Tutorial Part 3
Love from Texas!


testing to see if this shows up - earlier today a reader emailed me saying she could not leave a comment after 4 tries.....
ReplyDeletehummm... :/ I hope blogger is not broken.
I love your binding buddy. I always have to think about which way to turn my binding strips when I sew them together so they don't end up twisted. What a helpful 'tool' you have there.
ReplyDeleteI can see I need one of those RED F&P thingies. I usually overlap the binding since I never seem to get that join to work for me. LOL
ReplyDelete