Well last post I told you about how I spent a weekend morning out on the driveway bent over on all fours pinning on my binding... :P I forgot to mention that I did manage to get it sewn on too! Actually I was saving it for another post b/c while sewing I remembered to have the camera near by as I worked.
This is not a "real" tutorial but I thought I'd share some tips with you on how I do it.

I'm not sure at what point I noticed the thread.... but it was getting low - very low....

When I'm sewing and nearing the corner, I take out one of the pins and reposition it at an angle like shown in the photo below. Now I know exactly where to stop with my needle down so that I am only 1/4" away form the edge.

Then I stop and lift the presser foot and pivot around so that I'm headed directly towards the corner and then just before sewing remove that pin and sew out to the corner and then cut the thread.

Can you see what I just did? Not sure if I'm wording this the correct way...

and because I have already pressed with a hot iron the folded corners before I got started, the press crease is still there and the binding almost falls into place all by itself! ;)

Next, you fold it back down then put back at the machine... I start about 1/2" from the edge and back-stitch all the way to the edge then come forward.

oh holy smokes, I'm really getting low on my thread!

and this is something I just recently learned!!! I read over on Magnolia Bay Quilts' blog how she uses the Fons & Porter triangle trimmers for joining her binding strips and "CLICK" it made sence to me too! and now I can easily follow her directions and no more marking for when I join strips - but what about that final joining of edges for a smooth finish that you cant' tell where you started and stopped on a quilt... humm... Can I make it work for that to? Why YES I can! ;)

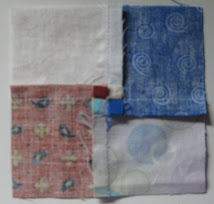
see that piece of light fabric in the photo above? on the cutting mat??? I just used a leftover scrap of binding to create myself a "HELPER" :) and am I ever so glad I did! Now the next time I need to bind, I won't have to go texting my friend jayardi asking her do I add 1/4" or subtract 1/4"??? b/c it seems so far in between finishes that I forget everything I know! :P

See, my little "HELPER" even has a seam in it and I can fold it to know exactly which piece needs to be face side down or up! Isn't that nifty?? ;)

ready to sew! ;) and I took some close ups so you could see where I used a pigma pen to write my notes on it... I think you can click on the photos to make larger.

had to word it "straight" cut as in up and down and not at an angle... you know b/c 100 years form now when I need my "HELPER" again I might forget what I meant.

I even drew out a little diagram of how that Red F&P triangle trimmer sat on the fabric - so next time there'll be no second guessing ... I can just look, line up the same and cut!

did I mention I was running low on thread!!! EEK! This is what I saw as I turned my last corner!!!

and Ta-Da!!! perfect line up! :)
As for thread... do you think it will be enough??

Can you see how far I have left to go -with just a few inches left!!! I started holding my breath at this point....

then I paused sewing to take another photo when I noticed it was off the spool and hanging down before it worked it's way to the tension disks..... do you see it?? look near the end of my rotary cutter! Yikes!

and believe it or not -I made it! WHEW!
With just about 18" left after I back stitched and came to my stopping point. I didn't bother trimming it off! I'll just keep it there and when I'm ready to sit down and hand stitch it down to the back side, I'll clip it off and thread it to use. ;)

as for what I'll use after that - well I'm hoping my black DMC floss will work (single thread at a time) b/c I do NOT want to make a trip to Walmart for thread!! not with two 2 year olds in this rainy cold weather! :P


OMG, you sure do things the hard way.
ReplyDeleteGreat binding tutorial! Thanks for sharing with us - love the ruler tip!
ReplyDelete